How to wire a garbage disposal: DIY Guide
This post may contain affiliate links which means I may receive a commission for purchases made through links.
Generally speaking, garbage disposals can be classified into 2 categories when it comes to power connection; plug-in models and hardwired units. As the name suggests, plug-in models come with a pre-installed power cord that plugs into an electrical outlet that is usually located in the kitchen sink cabinet. On the other hand, hardwired garbage disposals are connected directly to a dedicated electrical circuit, either on the wall near the kitchen sink or in the sink cabinet.
Either way, both types of garbage disposals must be connected to an electrical power supply to function. More importantly, you can turn hard-wired models into plug-in disposals, but you’ll have to buy a power cord separately and wire it to your garbage disposal.
Unfortunately, this can be a bit difficult for new DIYers. However, this guide will show you how to wire a garbage disposal that doesn’t come with a pre-installed power cord step by step!
What you will need
Materials
- Cord clamp
- Grounded appliance power cord with plug
- Plastic wire connectors
Tools/ Equipment
- Wire strippers
- Phillips screwdriver
- Flathead screwdriver (Optional)
How to wire a garbage disposal (Step-by-Step)
Step 1: Locate the wiring compartment and remove its cover
If your garbage disposal has a pre-installed power cord, look for the wiring compartment on the bottom of the unit. The compartment is usually kept closed with a metal cover that is secured with a screw. Use a screwdriver to remove this screw and remove the cover to access the compartment.
Step 2: Pull out the black & white wires in the compartment
Once you open the wiring compartment, you’ll see 2 wires; one colored black and the other colored white. Pull out these wires and check if their ends are stripped.
Step 3: Strip the wires
If the black and white wires are not stripped, use a wire stripper to strip about 3⁄4” of insulation from the end of each wire. This helps to prepare the cord wires of the garbage disposal for connection.
However, if the cords have stripped wires, you can skip this step. Also, some cords have a ground with a pre-installed ring connector. If that’s the case with your garbage disposal, leave the ground wire intact.
Step 4: Install a cord clamp
Install a cord clamp into the hole near the electrical wiring compartment. Typically, you should insert the threaded end of the clamp into the hole and tighten the nut to secure it. Make sure the clamp is tight enough to hold the cord in place to prevent the electrical connections from separating because of vibrations.
However, some garbage disposal models allow the cord clamp to be screwed directly into the unit. Therefore, the process of installing a cord clamp may vary from one model to another.
After installing the cord clamp in place, feed the end of the stripped wires through the clamp into the wiring compartment and tighten the 2 screws on the clamp to secure the cord in the clamp.
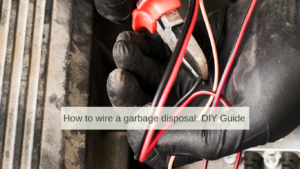
Step 5: Connect the wires
Wrap the stripped end on the ground (green) wire of the power cord around the ground screw on the garbage disposal and tighten the ground wire with a screwdriver to secure it in place. Alternatively, you can use the ring connector to connect the ground wire to the disposal.
Next, use a wire connector to connect the white (neutral) wire on the garbage disposal to the white (neutral) wire on the power cord. Similarly, connect the black (hot) wire of the garbage disposal to the black wire on the power cord. Gently wrap both wires with electrical insulation tape to ensure they’re secure.
In some cases, the hot wire of the garbage disposal can be red instead of black. If so, you connect the red wire to the black wire in the power cord.
Step 6: Reinstall the wiring compartment cover
Carefully tuck the wires into the garbage disposal’s wiring compartment, re-install the compartment cover, and secure it back in place with its screw.
Now that you have successfully wired your garbage disposal, secure all the plumbing connections in place. Then plug the garbage disposal cord into a switch-controlled receptacle with GFCI protection. Run cold water through the sink and flip on the wall switch to test the operation of the newly-wired garbage disposal.
Conclusion
While learning how to wire a garbage disposal may sound complicated, it’s a relatively straightforward process. After all, you only need to follow the steps above and wire your garbage disposal to a power cord if it didn’t come with a pre-installed cord. Alternatively, you can hard wire it directly to your home’s electrical system or hire an electrician to install it for you.